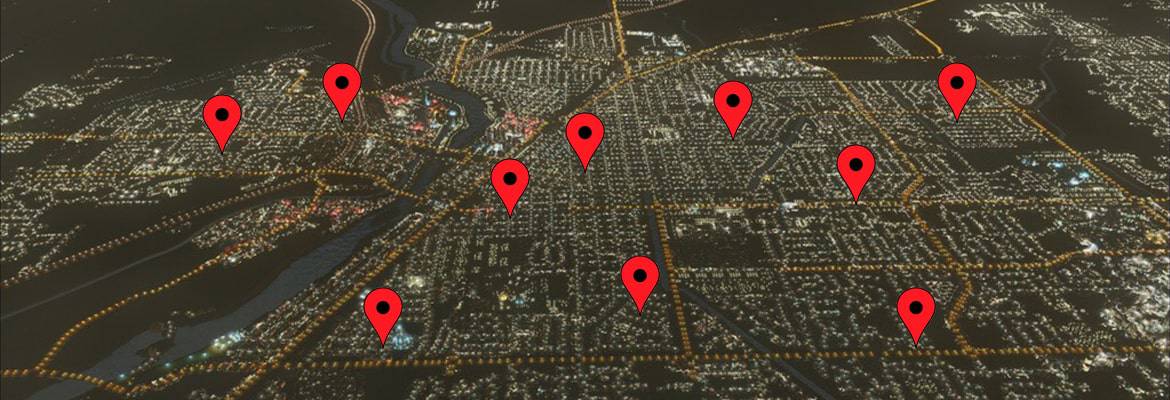
If you operate a local business and want to be found in Google Local Search, you need a Google My Business (GMB) listing. A GMB listing not only puts your business into Google’s search index, it also allows your business to be found in Google Maps and Google Image Search among other places. A completed GMB listing will allow potential customers searching for your products and services to be able to call you directly from Google Search and Google Maps. They can also get driving directions to your business, view your business hours, and read your reviews.
 You will then be prompted to sign into Google if you aren’t already. The next screen is where you will begin to fill in your business information. This is the important stuff. When it comes to ranking high in Google Local Search, Google wants to know exactly who your business is and how people can contact you.
 If you have selected “yes” for I deliver goods and services to my customers at their location check box, the next screen will ask you to indicate the geographic areas you serve your customers. There are 2 different ways you can designate your service area:
 Finally, the last step is to click “Continue” which will then lead to a small dialog box that asks you how you want to receive a verification code. This code is how Google verifies that your business is a real business. The best way for Google to know if your business is real or not is to mail a postcard to your physical address that contains a 5 digit PIN. This PIN will be used to verify your GMB listing at a later date. It typically takes about a week for the PIN to arrive in your mailbox, so keep a sharp eye out for it.
IMPORTANT!!! When you see this dialog box, you are effectively at a crossroad. Should you click the blue “Mail” button, the next screen will ask you to supply a contact name for whomever should receive the postcard at your business address. At this point, YOU ARE DONE WITH GOOGLE MY BUSINESS UNTIL THE PIN COMES IN THE MAIL. If you decide to go into your new listing and add images, add business hours, or otherwise edit it in any way, your PIN will become invalid and you will have to complete the mail verification all over again. I do not recommend that you send the PIN via postal mail just yet. Instead, click “verify later.” You’ll thank me later if you suffer from OCD like I do.

 You will see a familiar dialog box appear. This is the moment of truth. If you think you’ve missed something in your business information, there is still time to turn back by clicking “Verify later.” But, if everything is good to go and you are ready to get this show on the road, click the blue “Mail” button.
The final step in this whole process is now in front of you. This last dialog box shows you what the Google My Business PIN postcard will look like and gives you the option to add a contact name to the postcard. Go ahead an put your name into stone. You know you wanna!
This is your last chance to turn back. Click “Cancel” if you want to go back to the GMB editor. Or, click “Send Postcard” to finalize your Google My Business listing.
Once you click “Send Postcard,” you’re done. That’s it. You will see a final dialog box that tells you that your listing will appear as unverified in Google Maps until you verify your new listing with the 5 digit PIN that will arrive in your mailbox within a week. In my experience, it usually takes only 3-5 days before you receive it. Keep an eye out for it. You have 30 days to get the listing verified otherwise you’ll need to go through the verification process again.
 IMPORTANT!!! Once the postcard is requested after you click “Send Postcard,” DO NOT, under any circumstance, go back into your GMB dashboard and edit your listing in any way. Don’t add more images, don’t change the business name, don’t even access it. Any edit you make before you verify the listing with the PIN will void said PIN and you’ll have to start the whole verification process over again. It is my highest recommendation to just leave the listing completely alone until you get your PIN. It will save you lots of heartache if you do. Trust me, I know from experience.
Once you receive your PIN postcard in the mail, go ahead and sign into the Google My Business dashboard and look for the blue banner across the top of the dashboard with the “Enter Code” button. Click the button and enter the 5 digit PIN into the field. Click the “Submit” button and voilà! You are now the proud owner of a verified and live Google My Business listing.

*Authors Note: Google is always updating their products and Google My Business is no exception. Since I began working in the local search marketing industry, I have seen Google My Business morph from Google Places to Google+ Local to its current incarnation. And in between each major overhaul there have been multiple tweaks and changes. I realize that this post may become outdated at any time so if you see a link HERE, click it to view posts related to these changes.
Related Information:
Setting up a Google My Business listing for your business is very easy. Just follow the step-by-step instructions* in this guide and in no time you’ll be reaping the rewards of being found in Google Local Search.
If you need help setting up your Google My Business listing, don’t hesitate to contact Arcane Marketing and we’ll be happy to work with you. The success of your online marketing is our passion and we love it when our clients succeed! Now, on to the good stuff.
In The Beginning, There Was Darkness…
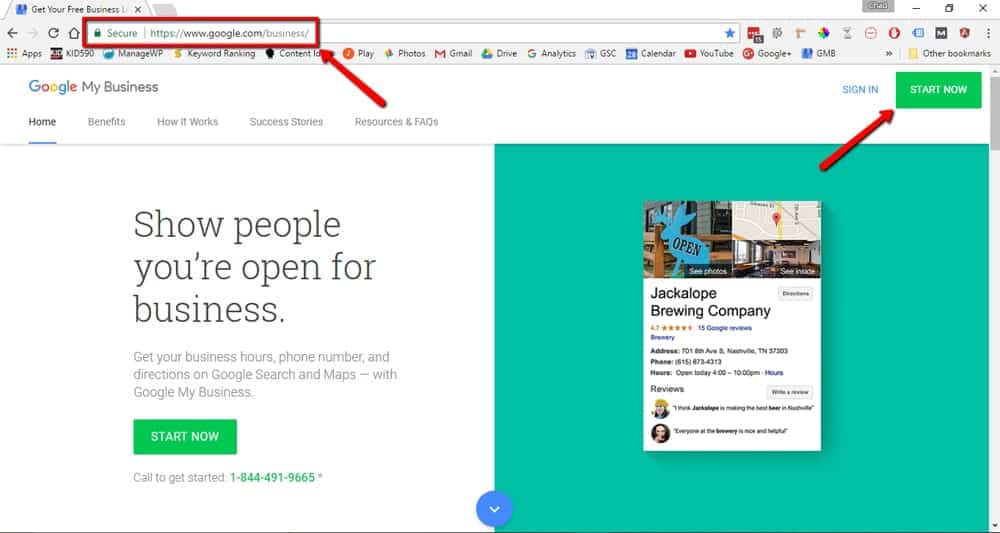
In order to create a Google My Business listing for your business, you will first need a Google account. If you don’t have one yet, your GMB listing cannot exist. So, Create a Google Account if you do not have one yet. Congratulations! You are now ready to begin. The very next step you need to do is visit the Google My Business page and click “START NOW.”
Then There Was Light…
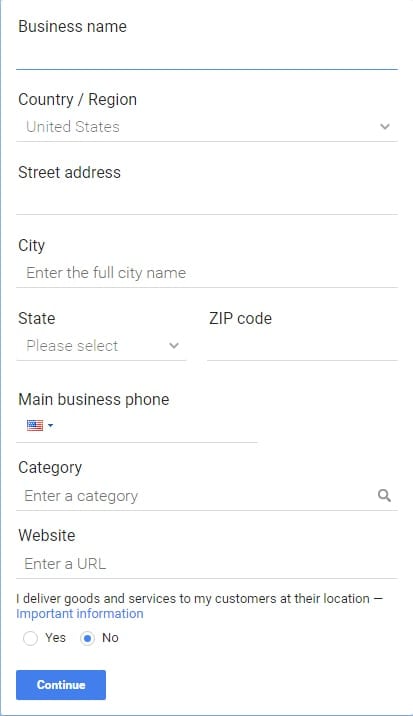
 You will then be prompted to sign into Google if you aren’t already. The next screen is where you will begin to fill in your business information. This is the important stuff. When it comes to ranking high in Google Local Search, Google wants to know exactly who your business is and how people can contact you.
- Business Name – Use your actual business name. Avoid using any other information that could confuse searchers.
- Country/Region – Select what country your business resides in.
- Street Address – Enter the number and name of the street your business is located at. Even if your business is a “Service Area Business,” this needs to be filled out for verification purposes. If your business shares the same building as other businesses, click “add line” to enter in your suite or lot number. Don’t put your suite or lot number in the main address line.
- City – Enter your city name here.
- State – Select your state from the drop down list.
- Zip Code – enter in your 5 digit postal zip code here.
- Main Business Phone – Enter in your 10 digit (area code+phone number) contact phone number here. This must be a phone number where customers can contact you directly. Only use a local phone number with a local area code. Don’t use an 800 number or any other variant. This is something that affects local rankings so be sure to use your local phone number.
- Category – Type in a word that best describes what your business is. GMB will provide the best matches for your entry. It is important that you choose a category that represents your main business offering/service.
- Website – If you have a website for your business, enter in your URL here. Otherwise, you can enter it in later.
- I deliver goods and services to my customers at their location check box – If you are a “Service Area Business” where you deliver your services or products to your customers and don’t serve your customers at the address you supplied above, check yes. This would usually be appropriate for caterers, for example.
- Finally, click “Continue“
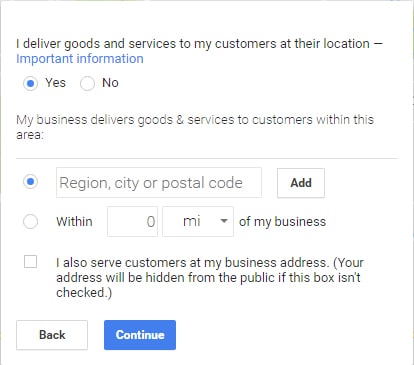
 If you have selected “yes” for I deliver goods and services to my customers at their location check box, the next screen will ask you to indicate the geographic areas you serve your customers. There are 2 different ways you can designate your service area:
- You can list out the zip codes or individual cities and counties you serve, or;
- You can denote how many miles from your location you are willing to travel to provide services.
- Yelp
- SuperPages
- YellowPages
- Apple Maps
- …and more.
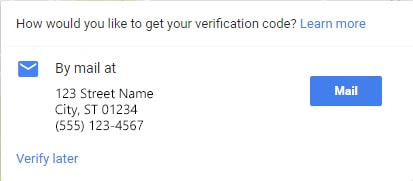
 Finally, the last step is to click “Continue” which will then lead to a small dialog box that asks you how you want to receive a verification code. This code is how Google verifies that your business is a real business. The best way for Google to know if your business is real or not is to mail a postcard to your physical address that contains a 5 digit PIN. This PIN will be used to verify your GMB listing at a later date. It typically takes about a week for the PIN to arrive in your mailbox, so keep a sharp eye out for it.
IMPORTANT!!! When you see this dialog box, you are effectively at a crossroad. Should you click the blue “Mail” button, the next screen will ask you to supply a contact name for whomever should receive the postcard at your business address. At this point, YOU ARE DONE WITH GOOGLE MY BUSINESS UNTIL THE PIN COMES IN THE MAIL. If you decide to go into your new listing and add images, add business hours, or otherwise edit it in any way, your PIN will become invalid and you will have to complete the mail verification all over again. I do not recommend that you send the PIN via postal mail just yet. Instead, click “verify later.” You’ll thank me later if you suffer from OCD like I do.
Form Begins To Take Shape…
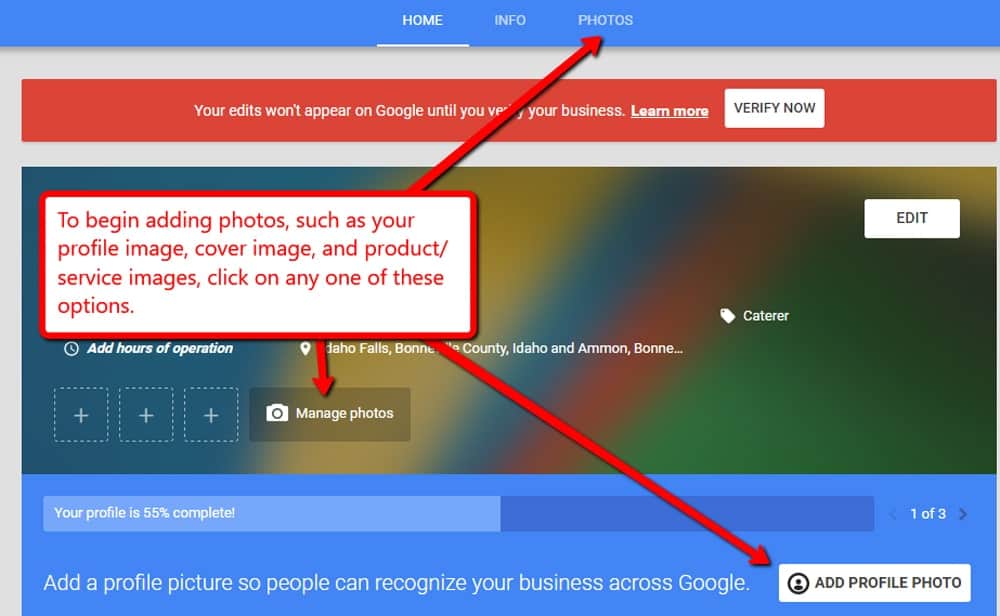
Once you click “Verify later,” you will be taken to your new Google My Business listing dashboard. This is where you will be able to fill out the remainder of your business information, add images, and then finally send off the verification post card. The first thing I recommend that you do is add images. Go to the image manager by clicking “photos” in the top menu of the business listing dashboard or by clicking the “Manage photos” button in the information panel. The two most important images to start with are:- Profile Image – This can be your logo or an image of your product/service. Google doesn’t care much for logos and won’t typically display them when your business appears in the Knowledge Panel. But, my OCD forces me to use my logo so I just do it. It is your choice. Google specifies that profile photos be sized at least 250px wide. I always upload profile photos at 500 x 500.
- Cover Image – The cover image will appear in Google Image search and as the main cover image of your Google+ page should you choose to utilize it. This image should be a big, clear image of your best product/service. It needs to be sized at 2120 x 1194 for best resolution.

Knowledge Is Established…
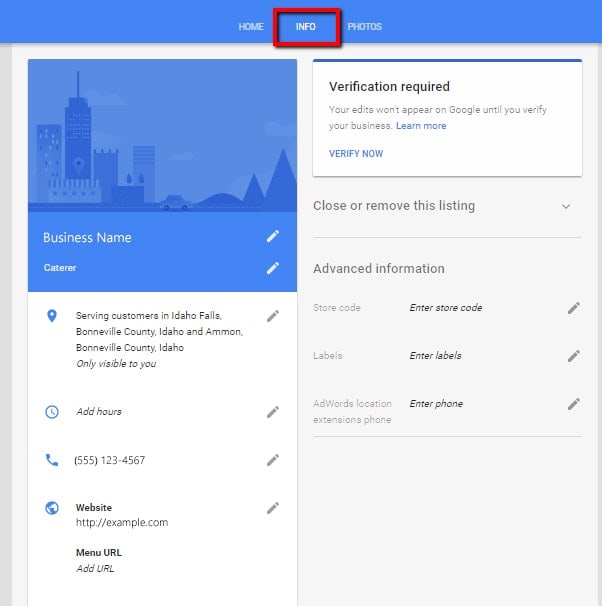
It’s now time to add the final touches to your Google My Business listing. At the top of your dashboard you will find the “Info” tab. Click it and you will be taken to the GMB listing information editor. It is here where you will be able to edit your business info. Did you change your mind concerning the business name? You can change it here. You can add your business hours. You can also add attributes such as if your business is ADA compliant; if you deliver your products; if you accept electronic payments. Depending on what type of business you run, there may be more options available. Fill this information out as completely as possible.
And In The End, We Saw That It Was Good…
Well, we have finally reached the end of the process. There is only one thing left to do and that is to get your beautiful new Google My Business listing verified and into Google Maps. No matter where you are in the GMB dashboard, there will be a prompt to “Verify Now.” Once you are satisfied with your listing, click “Verify Now.”
 You will see a familiar dialog box appear. This is the moment of truth. If you think you’ve missed something in your business information, there is still time to turn back by clicking “Verify later.” But, if everything is good to go and you are ready to get this show on the road, click the blue “Mail” button.
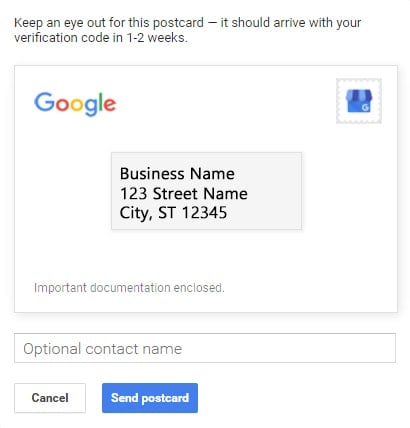
The final step in this whole process is now in front of you. This last dialog box shows you what the Google My Business PIN postcard will look like and gives you the option to add a contact name to the postcard. Go ahead an put your name into stone. You know you wanna!
This is your last chance to turn back. Click “Cancel” if you want to go back to the GMB editor. Or, click “Send Postcard” to finalize your Google My Business listing.
Once you click “Send Postcard,” you’re done. That’s it. You will see a final dialog box that tells you that your listing will appear as unverified in Google Maps until you verify your new listing with the 5 digit PIN that will arrive in your mailbox within a week. In my experience, it usually takes only 3-5 days before you receive it. Keep an eye out for it. You have 30 days to get the listing verified otherwise you’ll need to go through the verification process again.
 IMPORTANT!!! Once the postcard is requested after you click “Send Postcard,” DO NOT, under any circumstance, go back into your GMB dashboard and edit your listing in any way. Don’t add more images, don’t change the business name, don’t even access it. Any edit you make before you verify the listing with the PIN will void said PIN and you’ll have to start the whole verification process over again. It is my highest recommendation to just leave the listing completely alone until you get your PIN. It will save you lots of heartache if you do. Trust me, I know from experience.
Once you receive your PIN postcard in the mail, go ahead and sign into the Google My Business dashboard and look for the blue banner across the top of the dashboard with the “Enter Code” button. Click the button and enter the 5 digit PIN into the field. Click the “Submit” button and voilà! You are now the proud owner of a verified and live Google My Business listing.

And The Earth Was Filled With All Sorts Of Great Local Businesses!
Setting up a Google My Business is a very straight forward process and if you follow this guide closely, you’ll have your business listed in Google Local Search in as little as a week. The hardest part is waiting for that PIN postcard! If you have any questions about this process, do not hesitate to give Arcane Marketing a call at (208) 938-5988. We have set up hundreds of GMB pages for our clients and resolved even more GMB issues that give some business owners trouble. This is what we do. Anyways, I hope this post was helpful. We’d love to hear from you. Go ahead and leave us a comment below if you have something to add.*Authors Note: Google is always updating their products and Google My Business is no exception. Since I began working in the local search marketing industry, I have seen Google My Business morph from Google Places to Google+ Local to its current incarnation. And in between each major overhaul there have been multiple tweaks and changes. I realize that this post may become outdated at any time so if you see a link HERE, click it to view posts related to these changes.

